Install
Make sure you have:
- Installed the Netbird client on your host machine
- You are connected to the TAS hosting server on your host machine
- Your VM has FT Activation Manager installed
Configure
For your VM manager (VMWare, VirtualBox, etc.) make sure you have a NAT connection available.
VMWare:
- Click Edit>Virtual Network Editor…
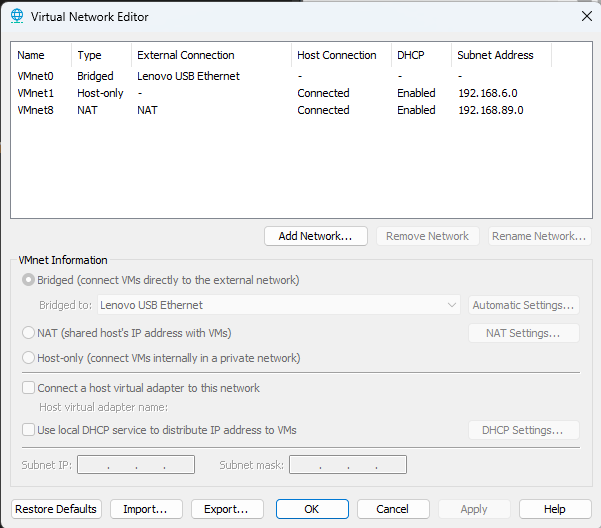
- If you have a network with type NAT, you’re good. If not:
- Click Add Network…
- Select a VMNet from the dropdown box and remember the number and click OK
- Select the new network in the list and click NAT
- Click OK
- While the VM is running:
- Select VM>Settings… in the menu bar
- Under the Hardware tab you should have at least one Network Adapter item in the Device column. If it does not have NAT under the Summary then:
- Click the Add… button
- Select Network Adapter and click Finish
- Select the new Network Adapter in the list. The default is to configure new Network Adapters as NAT, but if it isn’t then make these selections:
- Connect at power on
- NAT
- Click OK
You can only have one NAT network configured
VMWare allows for only one NAT network to be configured and listed in this list
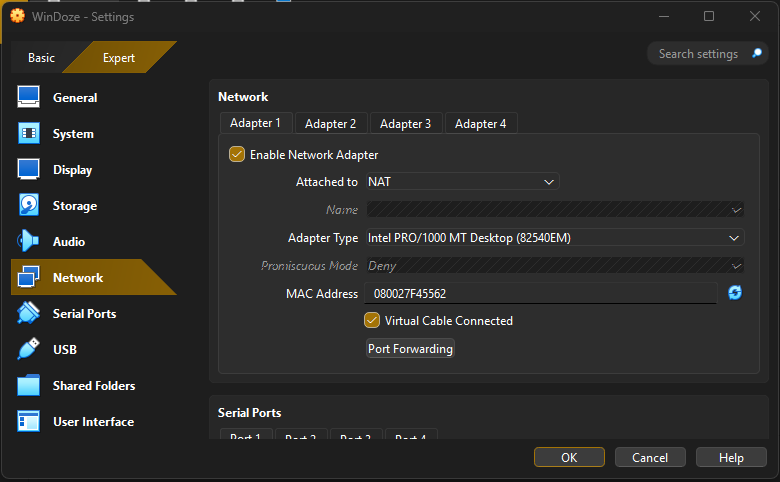
VirtualBox:
- While the VM is shutdown, select the VM and click Settings
- Select the Network tab on the left to see the Adapters
- In one of the Adapter tabs:
- Click Enable Adapter
- Select NAT from the dropdown
- Leave Adapter type as default
- Leave MAC address as default
- Select Virtual Cable Connected and click OK
Borrow Activations
Now that a network adapter is available, make sure to go into the VM and ensure the IP address for that adapter is set to DHCP/Obtain an IP address automatically:
- In your VM hit the Windows key and type View Network Connections and select the icon of that name
- Find the newest device (They are often numbered sequentially)
- Right click the adapter and select Properties
- Ensure the checkbox next to Internet Protocol Version 4 is checked and click the text, then click Properties
- Select the Obtain an IP address automatically radio button and click OK
In your VM open the FT Activation Manager and click the Manage Activations tab
- Click the “Update Activation Search Path” hyperlink
- Click Add Server
- Click the box under selected for the new server row
- Type
100.108.185.197in the Path to Activations column - While that row is selected, click Up until it is at the top of the list
- Click Save
Now you should be able to borrow activations from the TAS server. To test:
- From the Home tab, click Find Available Activations
- Click the row with the TAS server in the list
- Click the Refresh Activations button
Problems:
- If a red exclamation point appears next to the TAS server in the Find Available Activations area, check these items:
- Are you connected to the TAS server network through Netbird on your host machine?
- Do you have a NAT network on your VM manager?
- Is the network adapter in your VM that is attached to the NAT port set to automatically find an IP?
- Is the IP address for the server in FT Activation Manager correct?